
Introduction
In our previous blog, we introduced Kafka & explained the usecase of it. Apache Kafka is an open-source distributed streaming system used for stream processing, real-time data pipelines, and data integration at scale. It promises high throughput, fault tolerance, and durability. Kafka is commonly used for scenarios like event sourcing, log aggregation, and stream processing. Previously, we discussed its fundamental concepts and now, as promised, we’ll delve into the Kafka APIs with a focus on JavaScript. Let’s explore how to quick start Apache Kafka using the KafkaJs library.
Pre-Requisites:
Before we start, we need to install the following tools in our System:
- Docker
- NodeJs
- VsCode(Or any other IDE of your choice)
We expect the readers to have some understanding about the nodeJs framework. With this, we are ready to dive in.
The Dependencies
We need to import the KafkaJs library using the following command:
npm install kafkajsThe container setup
We are now ready to run the Apache Kafka as a docker container. But before we run the Kafka container, we have to run the Zookeper container as follows:
docker run -p 2181:2181 zookeeperBut why do we need to run Zookeeper? What exactly is Zookeeper? Zookeeper is a service for distributed systems that manages configuration information. It offers a centralised location for distributed operations to store data and facilitates communication between them.
Apache Kafka relies on Zookeeper to manage its metadata. Zookeeper monitors which Kafka Brokers are active in the cluster and tracks their status. It also holds information about existing topics, the number of partitions each topic has, and the locations of their replicas. Many other critical details are maintained by the Zookeeper service. This structure is integral to Kafka’s implementation. Therefore, to use Kafka, starting the Zookeeper service on port 2181 is essential.
Once the zookeper is up and running , we can start the Kafka Container as follows
docker run -p 9092:9092 \
-e KAFKA_ZOOKEEPER_CONNECT=<YOUR_MACHINE’S_IP>:2181 \
-e KAFKA_ADVERTISED_LISTENERS=PLAINTEXT://< YOUR_MACHINE’S_IP >:9092 \
-e KAFKA_OFFSETS_TOPIC_REPLICATION_FACTOR=1 \
confluentinc/cp-kafka- Here, the port 9092 of the container is forwarded to the port
9092of the host. - Also, we configure the environment variable
KAFKA_ZOOKEEPER_CONNECTto point to the running zookeper service. - The variable
KAFKA_ADVERTISED_LISTENERSis the list of hosts and their ports on which Kafka is listening. - The variable
KAFKA_OFFSETS_TOPIC_REPLICATION_FACTORspecifies the number of replications. In Kafka, data gets duplicated across multiple brokers to ensure better availability. This variable sets the number of brokers that replicate the information.
Once the Kafka container is up and running, the setup is complete. Now, it’s time to start coding.
The Implementation
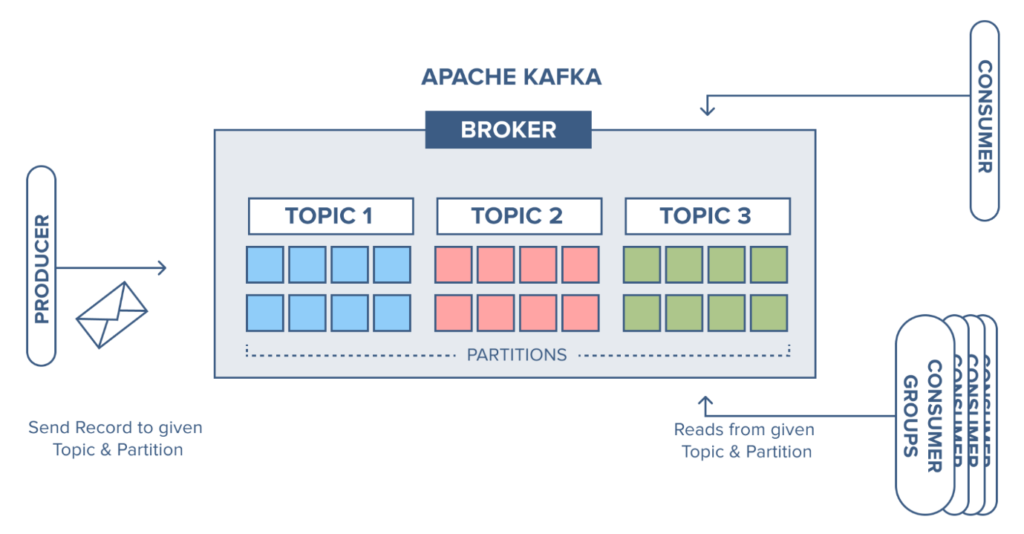
Before we start writing the code, a quick recap of the Kafka Architecture.
In a typical Kafka application, producers generate events while consumers process the data. Individual queues, known as partitions, are hosted by brokers. Event data is distributed among partitions based on partition keys, and similar data types are organised into topics.
So, in order to implement this we need to follow the following steps:
- Create an entity that stores details related to the Kafka topics.(Admin Client)
- Create an entity that stores details related to the Kafka broker.(Client)
- Create the Producer
- Create the consumer
We import the KafkaJs APIs in our code so that we can use its methods. The import statement is as follows:
const { Kafka } = require("kafkajs");1. Creation of Client
We can create a Client to store the details related to the Kafka Broker as follows:
new Kafka({
    clientId: "my-app",
    brokers: ["<Macine_Ip>:9092"],
})
Here, the clientId is the unique identification of the client that we are creating. The brokers key indicates the list of Kafka Brokers with their IP addresses.The complete implementation of the client is as follows:
//client.js

const { Kafka } = require("kafkajs");
exports.kafka = new Kafka({
    clientId: "my-app",
    brokers: ["<Macine_Ip>:9092"],
});
2. Creation of Admin Client
The next step is to create the admin client.The admin client component is where we create the Kafka Topics. We can create the admin client component using the admin() method of the Kafka API as follows:
const admin = kafka.admin();As per the KafkaJs API , we need to invoke the connect() method before creating the Kafka Topic. This basically registers the component as a Kafka Admin client.This can be invoked as follows:
admin.connect();We then use the createTopic method in order to create the topics. This method returns “true” when the topic is created successfully and “false” otherwise.
The topic can be created as follows:
await admin.createTopics({
    topics: [
      {
        topic: "rider-updates",
        numPartitions: 2,
      },
   ],
});
We pass an array of object named topics inside the createTopics method. Every individual object in the topics array will have the following keys:
topic: The name of the Kafka Topic
numPartitions: The number of partitions of this topic.
Once the topic is created, we need to disconnect the admin client. It can be done as follows:
await admin.disconnect();The entire source code for admin client is as follows:
//admin.js

const { kafka } = require("./client");
async function init() {
  const admin = kafka.admin();
  console.log("Admin connecting...");
  admin.connect();
  console.log("Admib Connection Success...");
  console.log("Creating Topic [rider-updates]");
  await admin.createTopics({
    topics: [
      {
        topic: "rider-updates",
        numPartitions: 2,
      },
    ],
  });

  console.log("Topic Created Success [rider-updates]");
  console.log("Disconnecting Admin..");
  await admin.disconnect();
}

init();
Notice how we utilize the “kafka” object from the “client” entity in “client.js” to create the admin client in “admin.js.” While we could combine these steps into one, we maintain separate files for better organization.
3. Creation of Producer
We create a Kafka Producer using the “producer()” method as follows:
const producer = kafka.producer();Once we create Producer, we need to register it into the kafka. We will do it using following snippet:
await producer.connect();The producer is the component that generates the data. The data is tagged to a particular topic. Kafka then puts the data into the partition of that topic. This is done as follows:
await producer.send({
    topic: "rider-updates",
    messages: [
        {key: 'name',value: 'Tony Stark'}
    ]
});
We pass the topic name and the actual data for the topic inside the send method of the producer. The complete code for producer is as follows:
//producer.js

const { kafka } = require("./client");
async function init() {
    const producer = kafka.producer();
    console.log("Connecting Producer");
    await producer.connect();
    console.log("Producer Connected Successfully");
    await producer.send ({
     topic: "rider-updates",
     messages: [
        {key: 'name',value: 'Tony Stark'}
     ]
   });
  await producer.disconnect();
}
init();
4. Creation of Consumer
We create the consumer entity as follows:
const consumer = kafka.consumer({ groupId: "user-1" });Then register the consumer with the Kafka as follows:
await consumer.connect();We make the consumer subscribe to the Kafka Topic. This will enable the Kafka to notify to the consumer whenever data of that topic is available.
The subscription is as follows:
await consumer.subscribe({ topics: ["rider-updates"], fromBeginning: true });We can then use the “run” method to perform further processing on the data pushed into the partition. In the below snippet, we print the data as well as the topic and the partition details of the data.
await consumer.run({
eachMessage: async ({ topic, partition, message, heartbeat, pause }) => {
      console.log(
        `${topic}: [${topic}]: PART:${partition}:`,
        message.value.toString()
      );
   },
});
The complete code for consumer entity is as follows:
//consumer.js

const { kafka } = require("./client");
async function init() {
  const consumer = kafka.consumer({ groupId: "user-1" });
  await consumer.connect();
  await consumer.subscribe({ topics: ["rider-updates"], fromBeginning: true });
  await consumer.run({
    eachMessage: async ({ topic, partition, message, heartbeat, pause }) => {
      console.log(
        `${topic}: [${topic}]: PART:${partition}:`,
        message.value.toString()
      );
    },
  });
}
init();
Steps to Execute
- Install the kafkajs package using the below command
npm install kafkajs- Run the admin.js file
node admin.js- Run the producer.js file
node producer.js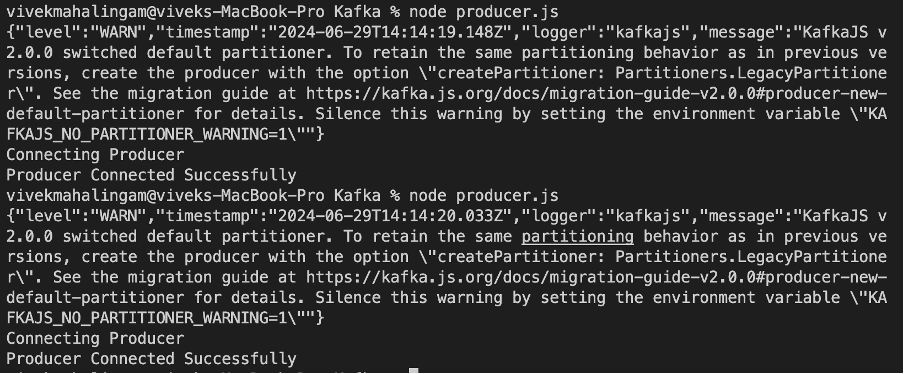
- Run the
consumer.jsfile
node consumer.js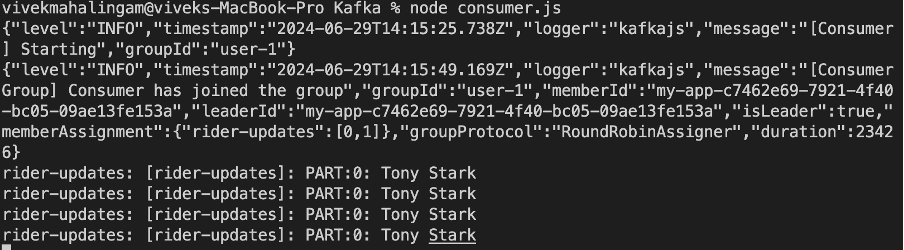
On running the consumer.js file, you can see the message getting printed along with the topic name and partition name.
Conclusion
And that’s how folks, we can implement Apache Kafka using the kafkajs API. There is much more that we can explore using the same and we will be coming up with that soon. We would love to know your feedback.