The hardest choices require the clearest data
Thanos, The Data Cleansing expert
Data is the new oil. The ability to store this data is the superpower. In an ideal world, softwares are perfect. They won’t fail and they don’t need any improvement. Alas! We don’t live in an ideal world. We need to constantly update softwares. The Docker images are constantly updated as a result. We also need to pull them and restart our containers.
Like any standalone software, Docker containers also generate lots of data. What will happen to the data when we stop and start the containers? Are they stored or simply deleted? In this blog, we will explore how docker handles data storage using Docker Volumes.
If you are new to docker, we have explained docker right from beginning in this blog, advancing more features here & finally a demonstration of dockerization of a real application here. Feel free to checkout.
Docker Storage
By default, Docker containers are not persistent. This means that when docker container is stopped/destroyed, all the data generated by the container are also lost along with it. But imagine a situation where you want the data to persist.
For example, let us say that you are running your database as a Docker container. Your Server performs various transactions and stores a lot of data in the database. In this case, it is necessary that the data stored is persistent even when the container goes down for some reason. In Docker, we can achieve this using the following options.
- Volumes
- Bind Mounts
Volumes
Docker Volumes are files/directories that are mounted to a particular container. The caveat is that these files/directories are completely managed by the docker. They are a part of the host’s file system. However, the host process cannot access or modify them, and they belong exclusively to the docker container. Some of the features of the Volumes are as follows:
- These volumes can be used to store the data generated by the container.
- They persist even after the container is stopped or deleted.
- They can be shared among multiple containers.
- They offer better performance because they are managed by Docker itself and can be optimised for performance.
Bind Mounts
Bind Mounts are files that are used for data persistence. However, they can be accessed by non-docker processes as well. It also needs host machine’s filesystem having a specific directory structure available because it uses absolute path for binding.
Okay, now let us try to explore more about Volumes and their commands
Create a volume
We can create a new Volume using the following command:
docker volume create <volume_name>List volumes
We can list all the volumes in the host using the ls command as follows
docker volume lsInspect a volume
We can inspect the details of a particular volume using the following command:
docker volume inspect <volume_name>Note the “Mountpoint” in the output. This is the directory of the host machine. When we associate a Docker container to this volume(Mounting of the volume), the data of the Docker container is stored in the path indicated by the “Mountpoint” inside the host. This directory is exclusively managed by the Docker and is not accessible to non-docker processes.
Remove a volume
We can remove a docker volume using the following command:
docker volume rm <volume_name>When we remove the volume, all the data stored in the Mountpoint is also deleted and the data is permanently lost.
Mounting a volume to a container
We can associate a volume that we created with a docker container. This is called “Mounting” a volume into a container. What we are basically doing is telling the Docker to store all the file/directory belonging to the container into a particular host file/directory that is referenced by the “Volume”.
We can mount a volume to a container using the following command:
docker container create --name <container_name> -v <volume_name>:/<Path_of_file/directory_inside_container> <Image_name>A quick recap on Docker exec
If we want to run a command or execute some script inside the running docker container, we make use of the ‘docker exec’ command. The command you specify with docker exec only runs while the container’s primary process (PID 1) is running, and it isn’t restarted if the container is restarted. The command runs in the default working directory of the container.
The -i flag keeps input open to the container, and the -t flag creates a pseudo-terminal to which the shell can attach.
A sample command to start the ‘sh’ script is as follows:
docker exec -it container-name shDocker persistence in action
Now let us try to apply all that we have learned into a real time scenario. We are going to spawn a Docker container of Mysql. Once the container is up and running, we can perform some transactions onto the database.
This will generate some data. When we stop this container, by default the data generated will be lost. Our objective is to persist this data through docker volumes. Let us see how we can achieve it.
Step 1: Create a Docker volume
We first create a volume named ‘ikalamtech’ using the following command
docker volume create ikalamtech The output is as follows:

Step 2: Inspect the volume created in step 1
We can inspect the details of the ‘ikalamtech’ volume using the following command:
docker volume inspect ikalamtechThe output is shown below. Note the Mountpoint. This is where our data will be stored. This file is completely managed by the docker.

Step 3: Create a Docker container
Create a Mysql container and mount the volume to that container using the following command:
docker run -d –name mysql-ikalamtech -v ikalamtech -p 3309:3309 -e MYSQL_ROOT_PASSWORD=root mysql/mysql-server:5.7Here kindly note few important remarks:
- -d : This flag is used to run the docker container in the “detached” mode that is in the background.
- -p: This is used to forward the port of the container to a particular host port. For more details, read our blog on Docker Networking.
- -e: This flag is used to set the environment variable. In this case, we are setting an environment variable named MYSQL_ROOT_PASSWORD to store the password of the root user of the database server.
The output is as below:

Step 4: Execute bash in the Mysql docker container
As we saw before, we can execute the bash script inside our running MySQL container using the following command:
docker exec -it mysql-ikalamtech bash
Step 5: Run the MySQL CLI
Once we start the bash inside our container, we can execute the MySQL CLI . This enables us to create databases, tables and perform various query operations. The command is :
mysql -uroot -prootAs you can guess, we are logging into the MySQL database server using the ‘root’ user when we execute the above command. The output is as follows:

Step 6: Create a database
We can create a new database using the following command inside the MySQL cli
create database ikalamtech
Step 7: Create a table
We then create a new table “student” using the following DDL Statement
CREATE TABLE student (name varchar(100),marks numeric);
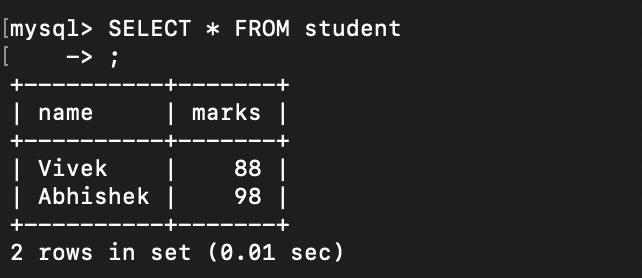
Step 8: Insert data into the table
Once having created the table, we can insert data into it using the following queries
INSERT INTO student VALUES(‘Vivek’,88);
INSERT INTO student VALUES(‘Abhishek’,98);
SELECT * FROM student


Step 9: Exit MySQL CLI and bash
We can exit the MySQL CLI and bash using the “exit” commands twice.


Step 10: Stop and start the container
We then stop and start the mysql-ikalamtech container using the following commands:
docker stop mysql-ikalamtech
docker start mysql-ikalamtech
Step 11: See the data that was stored previously
Run step 4 and 5 again. Execute the following query and you should be able to see the data.
SELECT * FROM studentConclusion:
In this blog, we saw how data persistence works in Docker. We explored the mechanisms provided by docker for ensuring persistence: volumes and bind mounts. We also explored various docker commands to create and manage volumes. Most importantly, we learned how to mount a docker volume onto a container. We saw the persistence of volumes in action by mounting a volume onto the MySQL database container.


